Home Personal Projects OSU Projects Element 1 Projects Videos
Smart Hub for Dumb Lights
This is a project that uses a Raspberry Pi to reproduce the signals of a radio frequency remote to control a set of patio lights. Once successful transmission from the RPi to the lights was achieved, the project then expanded to include a daily schedule in addition to on-demand signals, essentially turning the RPi into a smart hub for "dumb" lights.
This write-up is part tutorial and part story of a personal project. If you wish to follow this as a tutorial, please note that it is not written as a set of prescribed steps that must be strictly followed. Feel free to take any or all sections as inspiration and adapt them to your own project.
The GitHub repository for the project is located here.
Contents
- Background
- Setting Up the MQTT Broker
- Setting Up Node-RED
- Writing the RF Transmit Script
- Putting It All Together
- Addressing Stability Issues
- Polishing and Final Touches
- Results
- Future Expansion
Background
TL;DR
I have a set of patio lights controlled by an RF remote. I wanted to control them outside the limitations of that RF remote. I developed a temporary fix using a Flipper Zero. I realized I could develop the full solution using a Raspberry Pi.
Years ago I purchased a set of LED string lights for my back patio, very similar to model 56521 from Luminar. They look like typical string lights with an aesthetically pleasing bulb like you would find in a restaurant or bar patio. These lights have a feature that allows them to change colors from commands sent by a radio frequency (RF) remote. I liked the idea of having them on when I came home late at night (I typically enter/exit my property through a gate in my back fence that connects to a bike path rather than through the front door), but if I left my house before the sun went down I would often forget to turn them on ahead of time. I tried for a bit to bring the remote with me, but it only works up to a certain distance since it uses an RF signal and not Wi-Fi. I started to keep the remote in my home office since I liked to have them on as I worked at my computer in the evenings. However, I would often forget to turn them off until I was in bed about to go to sleep and would notice the light beaming in through my bedroom window, forcing me to get out of bed and go into the other room to turn them off. I thought that If I could somehow connect the lights (or even the remote itself) to my Wi-Fi network and make a custom app to control them, I could turn my lights on/off from anywhere that has Internet connectivity.
I looked into various smart outlet and smart switch products, but none of them fit my specific needs. They all would only control the power on/off aspect of the lights, and I wanted the ability to also control the colors. Furthermore, the RF receiver was at the end of the lights cable, in the same casing as the power adapter and plug. This was too far from my router to get a stable Wi-Fi connection.
In late 2023, when the Flipper Zero was going viral on YouTube and social media and getting banned in some places like Brazil and Canada, I thought this device might be a neat way to learn certain protocols and technologies. One of the first things I tried after purchasing one was to use the "Sub GHz" feature to capture the RF signals from my patio lights remote, save the signals in separate files on the device, and replay them at will. This provided a great temporary solution to my situation. I essentially cloned the remote and could now leave the actual one in my office and the Flipper next to my bed, allowing me to control the lights from both locations. However, because the RF signal only traveled so far, I still could not turn on the lights from downtown if I realized I left long before the sun went down and it was now late and dark at my house.
A friend then gifted me a Raspberry Pi and I realized that this could be the ticket to my solution. Based on some projects I had done at work, I realized that if I could host an MQTT broker on the Pi and utilize Node-RED to process the messages, I could likely wire up the Pi to an RF transmitter to send the commands to the lights. I could then control the lights from anywhere that I had an Internet connection.
The Plan
- Set up an MQTT broker on the Raspberry Pi and successfully communicate with it via my phone.
- Set up a Node-RED flow on the Pi to process the MQTT messages.
- Write a Python script to send the RF commands to the lights from the Pi.
- Call the Python script from the Node-RED flow based on the MQTT messages.
Setting Up the MQTT Broker
Initial Setup
Eclipse Mosquitto is an open source message broker using the MQTT protocol. I decided to make this the core communication for the lights. To get Mosquitto installed on the Raspberry Pi, I followed this guide. It is a very straightforward and helpful walkthrough on how to get Mosquitto installed on the Pi, how to set it up so that the broker starts running automatically when the Pi boots up, and how to set up authentication for connecting to the broker.
Before setting up any authentication, I started with a very simple configuration so I could be sure that all connections worked properly. My initial mosquitto.conf file was essentially just the following:
listener 1883 0.0.0.0
allow_anonymous true
There are various ways to test the connections. Personally, I followed Steve's Guide on setting up a python client using Paho. I set up two clients on a separate device (my laptop): a publisher and a subscriber. I would know that the broker was working if the subscriber was able to read the message sent from the publisher.
Another way to test the connections is to use MQTT Explorer. This is a GUI based tool that can subscribe and publish to a broker. It is very helpful in debugging and I used this method after the initial Paho test and throughout the project any time I needed to debug a communication issue.
I added the authentication as described in the aforementioned article after the unauthenticated connection tests. I then repeated the Python and MQTT Explorer testing to confirm that everything still worked after the authentication was in place.
My final mosquitto.conf file looks like this:
# Place your local configuration in /etc/mosquitto/conf.d/
#
# A full description of the configuration file is at
# /usr/share/doc/mosquitto/examples/mosquitto.conf.example

per_listener_settings true

pid_file /run/mosquitto/mosquitto.pid

persistence true
persistence_location /var/lib/mosquitto/

log_dest file /var/log/mosquitto/mosquitto.log

include_dir /etc/mosquitto/conf.d

listener 1883
allow_anonymous false
password_file /etc/mosquitto/passwd
I could now access the broker and send/receive messages from anywhere on my home network. However, the end goal would be to control the lights from anywhere with an Internet connection. To do this I needed to set up port forwarding.
Port Forwarding
This turned out to be very simple.
Access your router's interface by navigating a web browser to 192.168.0.1. You will then be prompted to log in using your router's password. Once logged in, there should be an option in the settings interface to add port forwarding. My router is Arris. The Arris interface has the port forwarding option under the "Advanced" section of the left-hand navigation menu. From there, you can enable the port forwarding and add a service. This service should include a helpful name (so you know what it is a few months down the road when you open it again), the IP of the Pi (Server IPv4), and the port mapping (both the internal and external ports). The default port for Mosquitto is 1883. To make it simple, I just used the same port for both the internal and external. Note that the external port is the one that you will be accessing from the outside Internet and the internal port is the one that the service is running on inside your network (on the Pi).
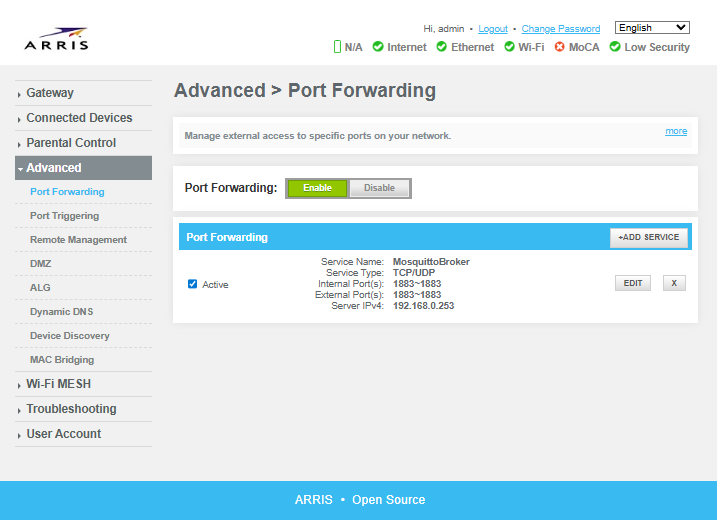
An example of the port forwarding screen of my router's interface.
Once the port forwarding is set up, you can then use MQTT Explorer to connect to the broker via your external IP (this can be found at https://www.whatsmyip.org/ or https://whatismyipaddress.com/). To further prove that you can access the broker from anywhere with an Internet connection, download an MQTT app for your phone and disconnect your phone from your Wi-Fi so it's on your mobile service provider's data connection. Then test the broker connection through your phone app.
Note: There are several MQTT apps out there for Android and iOS. Some of them are OK, but I really don't like any of them too much. I'll elaborate more on this later, but at this step it is worth mentioning that MyMQTT is the Android app that I found to be the most usable.
A quick note on security. It's best practice to close all unused ports. Therefore, if you get all this up and running and set the project aside for a couple months like I did, it's a good idea to deactivate the service or simply disable port forwarding on your router altogether until you're ready to continue.
Setting Up Node-RED
Node-RED is a "flow-based, low-code development tool for visual programming, originally developed by IBM for wiring together hardware devices, APIs and online services as part of the Internet of things." (Wikipedia)
Node-RED came preinstalled on my Raspberry Pi, and it likely is on yours too. In the event that it isn't, visit the official Node-RED documentation to get it installed. That article also says that you can set up Node-RED to autostart on system boot of the Pi with the following command:
sudo systemctl enable nodered.service
I could not get it to work using this command. Instead, I wrote a very simple bash script that contained nothing more than the line node-red and saved it to /home/raspberry/Documents/scripts/node_red_startup.sh.
I then opened up my crontab in the nano editor with the command crontab -e and added the following line to the end of the file:
@reboot sh /home/raspberry/Documents/scripts/node_red_startup.sh
I saved the file and rebooted the Pi and it worked.
To view the Node-RED interface, open the web browser to http://localhost:1880. From there you can make a very simple flow to subscribe to your broker and output the message contents to the debug window. With this step complete, I then shifted my focus to transmitting the RF signals using the Pi.
Tip: You can access the Node-RED interface on a different device by substituting
localhostwith your Pi's local IP in the browser of your development device.
Writing the RF Transmit Script
Determining the Correct Signals
As mentioned in the Background section above, I had already cloned the main RF signals of the remote (on, off, white, red, and blue) using the Flipper Zero. Check out the Flipper Docs for tips on how to do this for a variety of devices in different frequency bands. Once captured, I was able to easily get the files for these cloned signals onto my computer using the qFlipper app. The Flipper saves the recorded information in a .sub file containing several pieces of information. The most important parts are the protocol (e.g. Princeton 24bit), the frequency (e.g. 433.92 AM), and the "Key", which is the demodulated data from the signal carrier wave in hexadecimal.
As an example, the information for the "on" signal of the lights looks like this on the Flipper screen after being captured and saved:
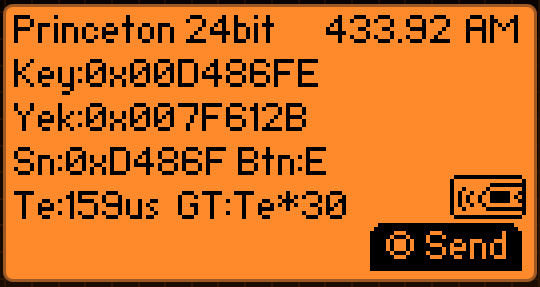
The saved patio lights "on" signal as seen from the Flipper screen.
The extracted .sub file for this signal reads as follows:
Filetype: Flipper SubGhz Key File
Version: 1
Frequency: 433920000
Preset: FuriHalSubGhzPresetOok650Async
Protocol: Princeton
Bit: 24
Key: 00 00 00 00 00 D4 86 FE
TE: 159
The .sub file format is described in greater detail in the documentation section of the flipperzero-firmware GitHub repository.
The Flipper actually tells you everything you need to reproduce the signal. However, I couldn't find explicit documentation on translating a Flipper .sub file to the Raspberry Pi. I therefore used some other techniques found in some other guides to confirm I had the correct information and to figure out what to do with it.
Many of the guides and tutorials I found online also set up a way to receive the RF signals on the Raspberry Pi. Luckily, most RF hardware to be used on a Pi come in packs with multiple sets of both transmitters and receivers. Just search amazon (or better yet, the Internet outside of Billionaire Bezos' Bazaar) for "433 MHz transmitter" and you should find a number of packs. This pack is the one that initially worked for me. They seem to be fairly underpowered (more on that later), but they worked well enough for me to move forward with the project.
Note: I subsequently replaced the RF hardware with this pack.
The first way I confirmed the information on the Flipper file was to follow an article on Instructables titled Super Simple Raspberry Pi 433MHz Home Automation. If you don't have a Flipper Zero, this is an interesting and very visual way to capture the signal. Unfortunately, it appears the article is no longer up as of this writing (Dec, 2025), so I'll give a brief summary here.
Note: To view the article in the Wayback Machine, click here.
The article is broken into two main sections: receive and transmit. The first section, receiving the signal, wires up the RX hardware to the Pi and uses a script to capture the RF signal and graph the results using Matplotlib. I used one of the images from the amazon posting of the hardware I purchased to identify the function of each pin and followed a pinout mapping for the Raspberry Pi to set up the receiver.
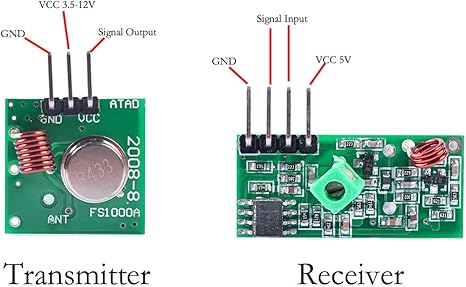
The pin functions of the RX and TX hardware as posted by the amazon retailer.
If I recall correctly, I did not need both the "Signal" and the "Input" pins on the receiver. Either one of them worked for this script and only one of them was necessary. I connected it to GPIO 27. My adapted version of the listening script can be found here. You will need to install Matplotlib on the Pi to use that script. I also recommend setting up a virtual environment before installing Matplotlib. I did this with the simple command within the project directory:
python -m venv .venv
You can then activate the venv with the command:
source .venv/bin/activate
Once the venv is activated, you can then install any dependencies you want without the fear of affecting your base Python installation. Matplotlib can be installed with the command:
pip install matplotlib
For more information on Python virtual environments using venv, see the official docs.
Run the listening script and press the button on the remote you want to clone relatively close to the hardware. If all goes well, the script will capture the signal and generate an image of the waveform. Here is an example of a signal plot from the Instructables tutorial (I neglected to save screenshots of my signals and only recorded the binary codes).
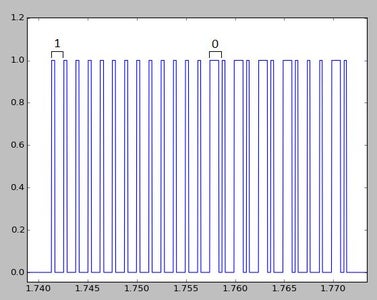
An example of a plotted RF signal.
An RF signal will typically consist of a preamble pattern, a data pattern that is repeated several times, and a conclusion. Reading an RF signal works by interpreting a pattern of high/low tones (or tone/silence) in combination with periods of short and long tones/silence. The combination will represent a 1 or a 0 that can then be interpreted as binary code. The exact combination of high/low and long/short is arbitrary and can depend on the protocol used. The preceding image from the Instructables article is zoomed in to a section of the data pattern and uses the following combinations to interpret the signal:
1 = short_on + long_off
0 = long_on + short_off
Luckily for me, when I used this convention to read the signal plot from my patio lights, the resulting binary code appeared to match the hexadecimal representation from the Flipper. Thank you, RapidTables!
It may sound like this method is tedious and not guaranteed, which is correct. However, it's a good option if you don't want to spend $200 on a Flipper Zero. It's also a good option if you want to learn more about what is going on and how these RF signals work, rather than just try to plug and play script kiddy style.
If you do have a Flipper Zero and you're interested in diving deeper into the analysis of the RF signals, I recommend checking out the YouTube channel of Derek Jamison. This video in particular is a great one to start with and explains how the signals work (probably in a better way than I just did). Some of his other videos also explain the "Read RAW" feature, such as this one showing how to capture and format a Read RAW signal, and this one showing how to decode and understand the data from it. This technique was actually the second way that I confirmed I was using the correct signal for my patio lights.
The Read RAW feature of the Flipper Zero saves the signal in a .sub file, just like the normal Read function. However, rather than presenting the data as a nice hex value in the "Key" field, the file has numerous "RAW_Data" fields that are each a long line of positive and negative numbers. The numbers represent the time in milliseconds of either tone (positive numbers) or silence (negative numbers), just like the high and low from the graph in the Matplotlib technique. You can identify a single section of data by looking for outstandingly long silence numbers and isolating the data number in between. Using this technique, I again confirmed the binary code of my patio lights signal as it matched the binary from the Matplotlib technique and the hex from the normal Read .sub file. Here is an example of a RAW .sub file from the lights:
Filetype: Flipper SubGhz RAW File
Version: 1
Frequency: 433920000
Preset: FuriHalSubGhzPresetOok650Async
Protocol: RAW
RAW_Data: 133 -898 163 -1118 163 -2746 99 -800 99 -664 131 -462 133 -4642 67 -3386 99 -761 363 -10148 65 -9092 67 -2016 165 -1194 197 -268 131 -9344 99 -5212 165 -3390 65 -296 101 -4998 97 -3594 65 -6924 65 -920 263 -18478 99 -3440 99 -1492 97 -302 99 -334 65 -4266 65 -5698 65 -196 97 -1086 99 -4034 327 -100 65 -8924 129 -164 195 -4698 67 -1930 99 -3320 99 -9062 67 -6470 67 -2238 65 -262 63 -7968 65 -984 65 -3560 133 -832 65 -332 99 -4068 65 -1156 65 -6572 101 -2506 63 -7936 99 -9174 131 -2294 63 -4150 97 -6378 65 -1228 65 -990 97 -7250 65 -14032 99 -200 65 -8392 131 -2898 65 -8026 67 -466 67 -630 97 -4638 65 -2392 65 -3640 65 -15850 65 -8168 295 -1878 97 -298 65 -1922 63 -5444 165 -296 65 -17026 167 -732 65 -1468 99 -2660 101 -8756 131 -2404 65 -1496 65 -7310 131 -5788 131 -232 99 -928 131 -4482 99 -3422 65 -8890 65 -2866 99 -334 65 -9062 65 -134 67 -1332 335 -560 257 -216 277 -570 267 -204 263 -576 303 -546 277 -212 271 -556 269 -578 275 -550 277 -556 279 -216 273 -196 285 -568 269 -242 231 -220 279 -216 275 -184 275 -216 271 -216 273 -218 273 -566 259 -5222 307 -180 291 -218 255 -550 305 -208 265 -544 303 -208 265 -544 303 -546 277 -214 271 -554 303 -546 275 -554 277 -558 277 -214 273 -196 283 -568 303 -206 265 -190 279 -214 275 -184 303 -184 273 -214 273 -216 273 -564 293 -5196 309 -182 289 -218 253 -550 305 -210 265 -544 303 -208 265 -546 303 -544 277 -214 271 -554 303 -546 275 -554 277 -558 279 -214 273 -194 283 -568 303 -208 263 -188 295 -216 253 -218 291 -178 267 -220 275 -214 275 -566 263 -5230 257 -226 287 -182 291 -562 285 -180 277 -560 303 -208 265 -544 305 -546 279 -212 271 -552 303 -546 277 -552 279 -558 279 -214 273 -194 283 -566 303 -174 299 -188 277 -214 275 -184 303 -184 303 -182 273 -214 273 -562 295 -5196 289 -190 325 -182 291 -528 317 -180 275 -554 305 -174 299 -542 305 -546 277 -214 271 -554 303 -546 277 -552 277 -558 279 -214 273 -194 283 -566 303 -174 299 -188 277 -214 275 -182 303 -184 303 -184 303 -184 273 -562 295 -5202 309 -182 291 -218 253 -552 305 -174 299 -544 303 -174 299 -544 303 -546 277 -214 271 -554 303 -546 277 -554 279 -554 277 -216 273 -194 283 -566 303 -174 299 -188 293 -216 255 -218 291 -176 269 -218 293 -216 253 -546 315 -5196 267 -204 297 -186 293 -560 257 -224 253 -568 305 -174 301 -542 305 -548 279 -214 271 -550 305 -546 277 -552 279 -554
RAW_Data: 315 -180 273 -192 281 -566 305 -174 299 -188 277 -212 273 -184 301 -184 301 -182 303 -184 303 -530 297 -5198 291 -188 327 -182 291 -522 317 -182 279 -560 303 -174 299 -540 305 -548 279 -214 271 -552 303 -546 277 -552 279 -556 281 -214 273 -192 279 -564 305 -174 301 -188 275 -214 273 -182 303 -182 303 -182 303 -182 303 -530 299 -5196 291 -224 289 -182 289 -556 285 -182 279 -564 303 -174 299 -540 305 -548 279 -214 271 -552 303 -546 277 -554 277 -558 279 -214 273 -192 279 -564 305 -176 299 -188 275 -214 273 -182 303 -182 303 -182 303 -182 303 -530 297 -5208 309 -182 289 -220 289 -516 305 -176 299 -540 305 -174 299 -542 305 -546 279 -214 271 -550 305 -548 277 -554 277 -556 279 -214 273 -192 281 -564 305 -174 299 -188 277 -212 273 -182 303 -182 303 -182 303 -182 303 -530 297 -5196 289 -224 289 -182 291 -554 285 -182 313 -530 303 -174 299 -540 305 -548 279 -214 271 -548 305 -548 277 -554 277 -556 313 -180 273 -192 279 -566 305 -174 299 -188 277 -212 273 -182 303 -182 303 -182 303 -182 303 -532 297 -5202 289 -182 303 -184 303 -564 265 -202 295 -540 305 -172 301 -542 305 -546 279 -214 271 -550 305 -546 277 -552 277 -554 313 -180 275 -194 281 -566 305 -174 299 -188 293 -216 255 -218 289 -178 269 -218 275 -182 303 -566 263 -5208 309 -182 291 -218 253 -552 303 -210 265 -544 303 -174 299 -544 305 -546 279 -212 271 -552 303 -544 277 -552 277 -558 279 -214 273 -194 281 -566 303 -174 299 -188 277 -214 275 -184 301 -184 303 -184 273 -214 271 -562 295 -5198 309 -182 289 -220 253 -552 305 -174 299 -544 303 -174 299 -542 305 -544 277 -214 273 -550 303 -546 277 -552 279 -556 279 -214 273 -194 279 -568 303 -174 299 -188 293 -216 255 -218 291 -178 267 -228 287 -182 291 -554 283 -5196 289 -186 277 -214 275 -566 269 -204 297 -542 305 -172 299 -544 305 -546 277 -214 271 -550 305 -546 277 -552 277 -554 315 -180 273 -194 281 -566 305 -172 301 -188 291 -218 253 -218 291 -178 267 -228 287 -182 291 -528 319 -5182 289 -188 279 -214 275 -566 267 -206 297 -542 303 -174 299 -542 305 -548 277 -214 271 -550 303 -548 275 -554 277 -554 279 -214 273 -194 281 -566 303 -174 301 -188 275 -216 273 -184 303 -182 303 -184 273 -214 273 -562 293 -5192 291 -186 327 -182 291 -528 317 -180 275 -556 303 -172 299 -544 305 -544 277 -214 271 -552 303 -546 275 -554 279 -554 279 -214 273 -194 281 -566 303 -172 301 -188 277 -214
RAW_Data: 273 -184 303 -184 303 -182 273 -214 273 -564 295 -5192 307 -182 291 -218 255 -552 305 -174 301 -542 303 -172 301 -544 303 -548 277 -214 271 -550 303 -546 277 -552 277 -556 279 -214 273 -194 279 -566 303 -174 299 -188 277 -216 273 -184 303 -182 303 -184 273 -214 273 -562 293 -5194 307 -182 291 -218 291 -516 305 -174 301 -542 303 -174 299 -542 305 -546 277 -214 271 -552 303 -546 277 -552 277 -556 279 -216 271 -194 281 -566 303 -172 301 -188 277 -214 273 -184 303 -184 303 -182 273 -214 273 -560 295 -5198 309 -182 291 -218 253 -552 305 -172 301 -542 303 -172 301 -542 303 -548 277 -214 271 -550 305 -544 277 -552 279 -556 279 -214 273 -194 279 -566 303 -174 299 -188 277 -214 275 -182 303 -184 303 -184 273 -214 273 -562 293 -5198 309 -182 291 -182 289 -550 303 -172 301 -542 305 -172 301 -542 303 -546 277 -214 271 -550 305 -544 277 -552 279 -554 279 -214 273 -194 281 -566 305 -172 299 -188 277 -214 273 -184 303 -184 301 -184 273 -214 273 -562 293 -5196 307 -182 291 -218 253 -554 305 -172 301 -542 303 -172 301 -544 303 -546 277 -214 271 -550 303 -546 277 -552 277 -556 279 -216 271 -194 279 -566 305 -174 299 -188 293 -216 253 -218 291 -178 267 -228 287 -182 291 -556 281 -5180 289 -190 283 -214 275 -568 301 -172 297 -542 305 -172 301 -542 303 -548 277 -214 271 -550 305 -544 277 -552 277 -556 279 -214 273 -194 281 -566 303 -172 299 -188 279 -214 273 -184 303 -182 303 -184 273 -214 273 -562 293 -5196 309 -182 289 -218 255 -550 305 -174 299 -542 303 -174 299 -542 305 -544 277 -214 273 -550 303 -546 277 -552 279 -556 279 -214 273 -192 281 -566 305 -172 299 -188 291 -218 253 -218 291 -178 267 -228 287 -182 291 -528 317 -5192 289 -184 275 -226 287 -532 307 -180 291 -532 319 -182 285 -542 303 -548 277 -214 271 -550 303 -548 277 -554 277 -554 277 -214 273 -194 281 -566 305 -172 299 -188 291 -218 289 -182 291 -178 269 -228 287 -182 291 -530 317 -5184 289 -186 275 -214 273 -566 303 -172 299 -540 303 -174 299 -544 303 -548 277 -214 271 -548 305 -548 277 -552 277 -554 315 -178 273 -194 279 -566 303 -174 299 -188 277 -212 275 -182 301 -184 301 -184 303 -182 303 -530 297 -5202 307 -182 291 -218 255 -552 303 -174 299 -540 305 -174 299 -542 303 -548 279 -214 271 -548 305 -546 277 -552 277 -558 279 -214 273 -192 297 -560 259 -224 253 -216 275 -212 273 -184 301 -184 301 -184 303 -182 303 -530 297 -5202
RAW_Data: 287 -182 303 -182 303 -562 265 -202 295 -540 305 -174 301 -542 305 -546 277 -214 271 -550 303 -546 277 -554 279 -554 279 -214 273 -192 279 -566 305 -174 299 -186 293 -218 289 -182 291 -178 267 -228 287 -182 291 -528 319 -5172 297 -202 291 -184 275 -566 305 -172 299 -540 303 -174 299 -542 305 -546 277 -214 271 -548 305 -548 277 -554 277 -554 279 -216 271 -192 281 -564 305 -174 299 -188 275 -182 303 -184 301 -184 301 -184 303 -182 303 -530 297 -5204 309 -182 291 -182 291 -548 305 -172 301 -540 303 -174 301 -542 303 -548 279 -214 271 -548 303 -546 277 -554 277 -554 279 -216 273 -192 279 -566 303 -174 301 -188 275 -212 273 -182 303 -182 303 -182 303 -184 303 -530 297 -5192 289 -224 289 -182 291 -522 317 -180 277 -562 303 -174 299 -542 305 -548 277 -212 271 -550 305 -544 277 -552 279 -556 279 -216 271 -194 295 -560 259 -224 255 -214 275 -212 273 -184 303 -182 303 -182 303 -184 303 -530 297 -5204 307 -182 291 -182 291 -548 305 -172 299 -544 305 -174 297 -542 303 -548 277 -214 271 -552 305 -544 277 -554 277 -558 277 -214 271 -192 279 -564 305 -174 301 -188 293 -216 291 -182 289 -178 267 -228 289 -182 291 -528 319 -5192 257 -214 291 -218 289 -534 281 -182 291 -552 303 -174 299 -540 305 -546 279 -214 271 -550 303 -546 277 -554 277 -556 279 -214 273 -192 297 -560 257 -226 253 -214 275 -214 273 -182 303 -182 303 -182 303 -184 303 -530 297 -5202 287 -180 303 -182 303 -562 265 -204 295 -540 305 -174 299 -542 305 -548 277 -214 271 -548 303 -548 277 -554 277 -554 279 -214 273 -192 279 -566 303 -174 301 -188 291 -218 289 -182 291 -178 267 -228 287 -182 291 -530 317 -5186 287 -186 277 -212 273 -566 303 -172 299 -540 305 -172 301 -540 305 -548 277 -214 271 -548 305 -546 277 -552 279 -554 279 -216 273 -192 279 -564 305 -174 299 -186 275 -214 273 -182 303 -182 303 -182 303 -182 303 -530 297 -5206 309 -182 291 -182 291 -548 303 -174 299 -540 305 -174 299 -542 305 -546 277 -214 273 -548 303 -548 275 -554 277 -556 281 -214 273 -192 297 -560 257 -224 255 -214 275 -214 273 -182 303 -184 303 -182 303 -184 273 -560 295 -5202 285 -182 303 -182 303 -564 267 -202 293 -540 303 -174 301 -540 305 -546 277 -214 273 -550 305 -544 277 -554 279 -556 279 -214 271 -192 279 -564 305 -174 299 -188 293 -218 289 -182 291 -178 267 -228 289 -182 289 -524 315 -5190 289 -186 277 -214 275 -566 267 -206 297 -540 303 -174
RAW_Data: 301 -544 303 -548 277 -212 271 -550 303 -546 275 -552 279 -554 279 -214 273 -194 281 -566 303 -174 299 -188 277 -214 275 -182 303 -184 303 -184 271 -216 271 -564 293 -5198 307 -182 291 -218 253 -548 305 -208 263 -544 303 -208 263 -544 303 -546 277 -212 273 -552 303 -544 277 -552 277 -554 279 -214 273 -196 283 -568 267 -240 233 -220 279 -216 275 -184 271 -216 273 -216 271 -216 273 -566 261 -5216 307 -182 289 -218 255 -550 305 -208 265 -544 303 -174 297 -544 305 -544 277 -212 273 -552 303 -546 277 -552 277 -554 277 -214 275 -194 283 -566 303 -172 299 -188 293 -216 255 -218 289 -178 269 -228 287 -182 289 -556 283 -5192 289 -186 277 -214 291 -528 291 -190 283 -568 305 -174 299 -542 305 -548 277 -214 271 -548 305 -548 277 -552 277 -556 279 -216 271 -190 279 -564 307 -174 299 -188 277 -184 303 -184 303 -184 303 -182 273 -214 273 -560 295 -5200 309 -180 291 -182 289 -548 305 -174 299 -542 303 -174 299 -542 305 -544 277 -214 273 -550 303 -546 277 -552 277 -554 279 -216 273 -194 279 -566 305 -174 299 -188 293 -216 253 -220 289 -178 267 -228 289 -182 289 -530 319 -5188 289 -184 291 -216 291 -534 281 -218 253 -552 305 -174 299 -544 303 -546 277 -214 271 -552 303 -548 277 -550 277 -554 279 -214 271 -194 283 -566 305 -172 299 -188 291 -218 289 -182 291 -178 267 -228 287 -182 291 -554 283 -5188 289 -188 281 -214 275 -566 267 -204 297 -542 303 -208 265 -544 303 -548 277 -212 271 -552 303 -546 277 -550 279 -552 279 -214 273 -196 281 -568 303 -172 299 -188 277 -214 275 -184 303 -184 271 -216 273 -214 273 -564 293 -5196 309 -182 291 -182 287 -548 305 -172 299 -542 303 -174 299 -542 303 -548 277 -214 271 -550 303 -546 277 -550 277 -556 277 -216 273 -194 283 -568 303 -172 267 -220 291 -218 253 -218 291 -178 267 -228 287 -182 291 -528 317 -5186 289 -186 279 -214 275 -566 267 -204 295 -542 303 -208 265 -542 305 -546 277 -214 269 -552 303 -548 277 -550 277 -554 313 -180 273 -196 281 -566 303 -174 299 -188 277 -214 275 -182 303 -184 273 -214 273 -214 273 -564 295 -5188 309 -182 291 -218 253 -550 303 -208 265 -544 303 -208 265 -544 303 -546 277 -214 271 -550 305 -544 277 -552 277 -552 313 -180 273 -196 283 -568 269 -240 233 -220 279 -214 275 -184 273 -216 273 -216 273 -216 273 -566 259 -127240 97 -5774 65 -17694 133 -792 65 -7706 65 -790 229 -264 131 -2360 99 -6008 65 -1430 99 -1594 131 -270 133 -8870
RAW_Data: 97 -1840 65 -1244 65 -8244 67 -330 691 -132 97 -990 163 -854 129 -198 65 -328 97 -360 129 -1904 65 -524 63 -724 99 -3718 131 -1266 99 -266 131 -866 133 -528 99 -134 65 -4664 167 -400 133 -2910 131 -498 67 -964 133 -266 67 -534 67 -332 65 -2892 131 -990 65 -534 165 -236 101 -66 131 -100 567 -100 99 -830 265 -664 65 -232 67 -300 67 -2026 99 -3222 99 -896 99 -4494 199 -2530 65 -532 99 -434 65 -362 97 -1262 97 -864 99 -1996 97 -830 65 -3464 65 -164 621 -100 793 -100 361 -164 65 -262 63 -788 97 -228 131 -524 65 -764 131 -100 97 -664 65 -134 131 -4300 131 -5460 65 -266 99 -8884 131 -166 99 -132 531 -66 621 -956 131 -164 163 -1512 97 -362 165 -556 167 -1764 65 -1580 65 -132 131 -656 65 -628 165 -168 67 -2116 65 -1412 131 -296 63 -1956 131 -2316 63 -1214 65 -1264 99 -2528 65 -2292 67 -3054 67 -862 65 -1148 65 -7972 65 -950 195 -1872 67 -2018 99 -5282 65 -8218 133 -8616 165 -8710 199 -4936 131 -2592 65 -304 133 -1768 65 -2154 165 -2588 65 -2172 99 -194 129 -5502 167 -8220 67 -2946 65 -2066 65 -15578 67 -8136 65 -4448 99 -8054 65 -198 63 -1280 65 -4360 131 -926 63 -1220 165 -1496 199 -932 99 -7660 65 -5242 65 -262 65 -4104 67 -3524 99 -6924 65 -700 65 -4718 99 -9130 263 -2652 65 -5960 65 -3592 65 -6406 65 -1300 99 -1746 65 -3554 63 -1226 65 -1598 65 -4868 99 -6868 97 -1456 65 -13068 67 -7300 65 -5970 97 -7536 65 -200 67 -4716 129 -7466 199 -268 97 -686 97 -2806 97 -2998 133 -1824 63 -8830 65 -8316 65 -3726 99 -12442 65 -2382 693 -538 729 -456 667 -542 693 -522 503 -100 477 -134 291 -352 299 -298 319 -288 455 -136 305 -332 465 -164 517 -68 473 -170 315 -276 493 -66 329 -322 469 -170 435 -128 291 -320 295 -334 497 -98 331 -268 361 -232 331 -312 491 -100 333 -260 331 -136 99 -102 469 -168 297 -266 539 -100 311 -312 459 -134 301 -304 309 -332 471 -102 333 -310 269 -328 271 -340 265 -348 521 -68 303 -300 301 -346 491 -100 501 -102 343 -304 461 -96 523 -128 483 -132 283 -316 293 -326 303 -308 305 -312 457 -136 303 -102 389 -320 457 -136 337 -298 289 -320 491 -102 297 -226 679 -520 695 -470 717 -326 129 -64 717 -518 453 -172 455 -130 315 -318 259 -370 275 -302 505 -100 331 -268 491 -168 445 -134 477 -136 295 -354 451 -132 349 -256 461 -136 517 -98 321 -320 263 -134 103 -104 473 -100 309 -346 303 -306 303 -296 473 -134 343 -274 305 -302 463 -166 279 -310
RAW_Data: 491 -134 265 -324 499 -134 275 -312 505 -98 1725 -134 329 -64 63 -170 441 -132 939 -322 299 -166 65 -136 305 -328 467 -130 485 -134 469 -102 339 -306 301 -278 303 -240 407 -298 467 -162 285 -322 463 -130 503 -130 261 -342 299 -292 501 -100 309 -2160 651 -558 739 -462 657 -538 671 -540 493 -134 479 -132 481 -134 299 -304 323 -228 529 -166 275 -312 493 -136 473 -134 479 -130 417 -194 533 -306 491 -66 561 -100 305 -102 291 -352 2137 -258 529 -98 285 -96 93 -130 455 -196 471 -132 305 -308 459 -172 271 -298 499 -134 397 -234 295 -294 485 -132 289 -286 325 -326 255 -286 423 -228 501 -132 277 -342 293 -318 463 -134 509 -132 259 -310 489 -102 541 -100 471 -162 323 -260 297 -330 301 -308 301 -276 529 -128 287 -336 261 -286 555 -130 253 -320 327 -256 525 -166 277 -276 99 -1352 261 -98 1017 -66 167 -890 99 -230 295 -294 99 -4480 165 -532 65 -5372 63 -3060 65 -7656 165 -1048 97 -1282 133 -66 133 -2294 131 -134 1721 -162 65 -986 65 -334 99 -2782 65 -726 99 -2126 97 -632 331 -294 63 -894 199 -798 67 -2264 99 -4996 63 -724 63 -4614 1329 -66 133 -66 165 -100 99 -168 131 -234 101 -534 65 -164 231 -134 263 -464 133 -398 133 -3354 65 -98 99 -1030 101 -902 65 -762 65 -3432 129 -100 65 -1642 97 -1548 99 -2350 99 -7004 65 -268 133 -1698 131 -4444 165 -364 65 -3410 99 -692 65 -4510 65 -8218 97 -5688 65 -980 65 -4812 197 -2158 65 -8116 99 -66 165 -7600 65 -1758 133 -564 65 -732 65 -2604 65 -556 65 -2140 63 -7600 97 -888 65 -790 97 -1516 65 -724 165 -818 131 -1488 99 -266 165 -1632 131 -538 65 -300 99 -674 65 -1820 65 -7790 129 -2990 65 -7004 97 -362 131 -1518 231 -996 65 -8620 165 -268 97 -7470 97 -392 97 -3186 65 -4920 65 -166 63 -6842 99 -2012 391 -3094 361 -296 65 -98 95 -2442 97 -1496 97 -894 65 -964 65 -262 129 -458 63 -1092 99 -864 131 -198 65 -886 65 -5656 133 -6928 131 -622 65 -12402 65 -3838 99 -1464 65 -430 133 -1728 99 -100 63 -824 65 -690 65 -326 165 -362 99 -492 65 -1874 99 -434 65 -98 99 -428 97 -558 65 -1324 131 -730 99 -2088 65 -268 65 -400 101 -400 65 -762 133 -2286 99 -5762 65 -1654 99 -766 133 -1426 99 -1820 99 -1624 65 -1388 131 -400 133 -4412 99 -3560 99 -664 165 -2152 65 -7154 67 -330 99 -6888 67 -4868 63 -132 65 -7900 65 -7080 99 -3808 97 -802 97 -558 97 -3204 99 -100 99 -630 131 -1956 129 -4236 165 -4600 65 -3226 97 -1252
Once I was confident about the signal I needed to send, I then swapped out the RX hardware for the TX hardware and wired it up to the Pi. I again used the pin identifying picture from amazon and the pinout mapping to do this.
Transmitting the Signals
Getting the timing right for the signal lengths (short vs. long in ms) proved to be pretty tricky. However, after some trial and error and a little help from some AI to analyze my flipper files and my Python script, I landed on a Python library to do the heavy lifting of the RF transmission. The library is rpi_rf. If I recall correctly, this library was pre-installed on my RPi. If it's not on yours, you can install it with pip install rpi-rf. Notice the dash (-) in the pip install command as opposed to the underscore (_) that should be used in the import statement (from rpi_rf import RFDevice). Documentation for this library can be found on pypi and GitHub.
To test that I was sending the correct signal, I set up my Flipper Zero to listen for RF signals next to my RPi transmitter. After working out the bugs in my script the Flipper sounded the alert that it had captured a signal. I checked the hex value of it and it matched the one I sent from the Python script! Since the lights did not turn on when I successfully captured this signal, I assumed the transmitter was not powerful enough to reach the RF receiver on the patio lights. Maybe it was my poor soldering skills, or maybe it was my lack of knowledge, but every time I tried to solder an antenna to a transmitter to extend the range I seemed to fry it. I then found a workaround by finding a spot in my bedroom that was close enough to the patio lights receiver for the RF signal to reach it, yet close enough to the wall of my home office so that I could reach the Pi from the keyboard and monitor in my office via a bluetooth connection (this makes it much easier to work on, since my bedroom isn't really set up with a desirable space for computer work).
Pro Tip: I found a bluetooth keyboard with built-in touchpad to control the Pi. I also got a wireless HDMI transmitter/receiver and an HDMI switch to alternate my 2nd monitor between the Pi and my desktop in my home office. Those products aren't the only ones out there, and you may be able to find better deals, but those are the ones I ended up getting.
The script is very simple and reusable. It uses argparse to accept an argument representing a command to forward to the lights. The argument given to the script is a string (on, off, blue, white, etc.). The script stores a dictionary mapping expected string commands to the hex code values of the different signals. After confirming that the string represents a valid key, the hex value is then transmitted via the RFDevice class of the rpi_rf module.
The most up-to-date version of the script can be found here.
With the Python script successfully transmitting the RF signals to the lights, and my work station connected to the Pi from the other room, it was now time to return to Node-RED and start putting it all together.
Putting It All Together
Sending Commands via MQTT
The first step I took to incorporate my Python script into the Node-RED flow was to call it from a simple exec node and activate that node from a simple inject node. After confirming that the lights would respond correctly to the signals triggered through Node-RED, I then hooked it up to the mqtt in node described earlier. I added some string parsing and error checking to make sure it would only call the exec node with valid arguments, and then tested it by sending the commands through the MQTT Explorer app on my desktop.

The initial exec node called from MQTT before string parsing or error handling.
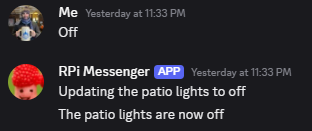
From here, I started testing it with various MQTT apps for my Android phone. As mentioned earlier, the end goal of this project is to control the lights from anywhere with an Internet connection (i.e. mobile data connectivity). Also as mentioned earlier, I did not like any of the MQTT apps available for Android devices that I found. I thought about making my own custom Android app, and I still might eventually do that. However, I realized it would be much quicker and easier to set up a private Discord server and make a Discord bot that could relay commands and the status of the lights. This turned out to be a very fun part of the project.
Creating the Discord Bot
I created the Discord bot in three basic steps. First, I made a dedicated server for the bot. Then I made the bot on Discord's developer website. Once both the server and the bot were created, all I needed to do in the third step was to invite the bot to the server.
-
Creating a Dedicated Server
Creating a personal Discord server is very straightforward. If you haven't done so yet, all you need to do is simply click on the circle icon with the plus (+) in it at the bottom of the list of your server icons.
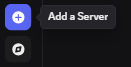
After you click on it, a menu will pop up with the option to "Create My Own" and after a few more clicks you'll have your own server. Add an icon image for your server so it stands out in the list, and a channel for each device that you want to control to keep things organized (if you want to organize it like I did, it's completely up to you).
-
Creating the Bot
With my dedicated Discord server up an running, I then began to set up the bot. This can be done from the developers section of the Discord website. The helpful docs page can be found here. The Applications page can be reached at the top of the left-hand navigation menu. You will need to log in with your Discord account credentials to reach this portion of the website.
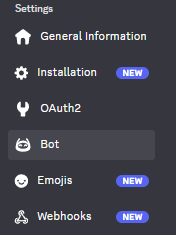
Once logged in on the Applications page, click on the blue "New Application" button on the upper-right. You will be prompted to give the app a name. I chose "RPi Messenger" since this app would essentially serve as a messenger between my phone (or computer) and the Raspberry Pi. After agreeing to the Terms of Service and confirming that you're a human, the "General Information" screen for the app will be displayed. Use the navigation menu on the left to move to the "Bot" page under the Settings section.
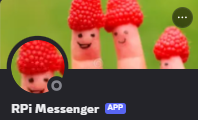
Give the app an icon image so it stands out, and a banner for a nice touch. I gave it the same one that I gave my server: a fun image of a finger with a happy face drawn on it and wearing a raspberry as a hat.
Beneath this area will be an entry box to update the bot's Username. I kept it the same as the Application name (the default setting). The next item on the settings menu is the "Token". If you see the token value and a blue "Copy" button, click copy and immediately save it somewhere safe. It will only be shown once and you will need to reset it if you lose it. If it's already hidden and you only see the blue "Reset Token" button, go ahead and reset it. You will need to enter your password in order to reset it. I had to reset it a couple times. It's a bit of friction, but overall inconsequential if the bot is still new and nothing else depends on the token yet. Below is an example of the token from a throwaway test bot I made.

To make things easy, I kept "Public Bot" checked and "Requires OAuth2 Code Grant" unchecked considering I don't intent to invite anyone else to the dedicated server this bot is on and don't intend to invite the bot to any other servers.

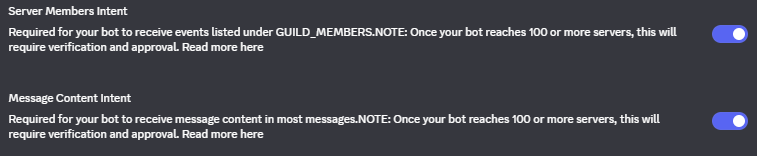
In the "Privileged Gateway Intents" section, make sure that "Server Members Intent" and "Message Content Intent" are checked. These are necessary for the bot to receive the content of messages sent in the server channels.
Make sure to save any changes.
-
Attaching the Bot to the Server
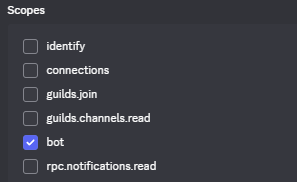
The final step in setting up the bot is to invite it to the dedicated Discord server. To do this, move from the "Bot" page up to the "OAuth2" page of the left-hand navigation menu and scroll down to the "OAuth2 URL Generator" section. Under "Scopes" check the box for "bot".
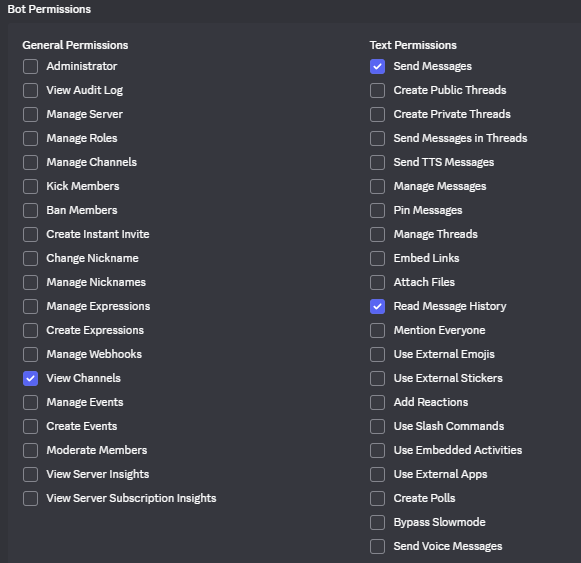
After selecting the "bot" checkbox, a new section will appear named "Bot Permissions". To allow the bot to send and receive messages back and forth between Node-RED and Discord, I selected "View Channels", "Send Messages", and "Read Message History". If you want your bot to have additional abilities, check the appropriate permissions boxes in this section.
At the bottom of the page will be a Generated URL. Copy this and enter it into a new tab in your web browser. It will display a few more confirmation screens to authorize the bot. Once authorized, the bot will be added to the server!


Integrating the Bot with Node-RED
There are several node libraries that integrate Discord with Node-RED. My RPi seemed to be a bit dated, and while several were searchable from the Node-RED "Manage palette", all but one required me to update my underlying NodeJS version for them to work. I decided to go with the one library that did not require fully updating NodeJS and Node-RED: node-red-contrib-discord 5.0.0. That library hadn't been updated in nearly 5 years. It is definitely a little buggy, but it serves its purpose for my project and hasn't yet given me enough trouble to force me to try a more recently maintained and updated one.
The Discord library is fairly simple to use. You just need to create a discord-token node with the token you saved when creating your bot and give it a helpful name. This discord-token node can be created within (while setting up) a discordMessage node or a discordSendMessage node, which simply listen for and return messages or send out message payloads, respectively.
From here I set up two main sections of the flow. The first section starts by using the discordMessage node to listen to commands sent via the Discord bot. It then passes the message payload through a series of string parsing and verification nodes. If the received command is valid, it is forwarded to the MQTT broker. If the command is invalid (for example, I often send "test" to simply see if the bot is responsive), it returns a message listing the valid command options.

The flow section that forwards Discord messages to the MQTT broker.
The second main section of the Node-RED flow starts by subscribing to the MQTT broker. Any messages published by the broker will be received by this node and go through some string parsing steps before being forwarded to an exec node to call the Python script that sends the RF signals. Even though the incoming Discord messages are validated before being sent to the MQTT broker, there is a potential that the broker could receive an invalid message from a third party method (like MQTT Explorer). However, the Python script itself also has error handling and will return an exit code of 1 if a valid command was not successfully received and sent. More string parsing steps follow to combine the return code from the exec node with the command from the mqtt in node and build a nice, readable message about the status of the action (whether the script completed successfully or not). The discordSendMessage node then sends this message out to the Discord bot.

The flow section that sends commands from the MQTT broker to the exec node and reports back to Discord.
See the Results section for an image of these flow sections in the full flow context. There is also an image posted in the GitHub repository of the project.
Replacing the MQTT Android App
At this point, the Discord server and bot became my primary means of communication with the RPi, essentially replacing the user-unfriendly MQTT Android apps. Rather than communicating with the broker directly, the Discord nodes utilize Discord.js which communicates with the Discord server via WebSockets over TLS/SSL (WSS). More details can be found in the docs section of the Discord Developer's page, but here is an image that demonstrates the connection at a high level:

WSS communication between the Discord bot and the Discord Gateway.
Because the WSS protocol is encrypted and the connection is outbound from Node-RED, there is no need to expose any specific ports. It's best practice to only expose ports that are regularly being used or are essential for the services to run correctly, so it's a good idea to go back to the router interface at this point and close the port exposing the Mosquitto broker to the public-facing Internet (1883).
Because I am now utilizing the Discord bot as the main means of communication with the RPi, the MQTT broker could probably be bypassed altogether. This would certainly simplify the Node-RED flow and the overall project. However, I decided to keep the MQTT broker for a couple reasons. First, I still have the idea of possibly making a custom Android app that would utilize MQTT to communicate with the RPi. Second, I experienced enough bugginess of the Discord node library that I held and still hold an attitude to be ready with backup methods of communication. If you're using this writeup to influence your own project, weigh these options and make the decision that makes the most sense for your situation.
Addressing Stability Issues
Several issues caused the RPi to periodically lose connectivity. Through hours of troubleshooting, I ended up with the following solutions.
Disabling Wi-Fi Power Management
Wi-Fi Power Management is enabled by default on the Raspberry Pi. This is likely because these devices are often used in restricted power scenarios. After all, it's a fanless board with light-weight components, not a gaming PC. Wi-Fi Power Management allows the Pi to put the Wi-Fi adapter into a sleep state to conserve power. Unfortunately, keeping this setting on can cause issues when constant connectivity is desired (like when I want to turn on or off the lights at random hours throughout the day). In order to disable this feature, I did the following.
First, I checked to make sure it was on and turned it off with the following commands:
# Check Wi-Fi power saving (if using Wi-Fi)
iwconfig wlan0  # Look for "Power Management:on"

# Disable Wi-Fi power management
sudo iwconfig wlan0 power off
For a more permanent solution, I created two services in /etc/systemd/system/. The first was wifi-powermanagement-off.service:
sudo nano /etc/systemd/system/wifi-powermanagement-off.service
I then added the following:
[Unit]
Description=Disable Wi-Fi Power Management
After=network.target   # NOTE: I had a typo in netwrok. It is likely that this is why I made two services.

[Service]
Type=oneshot
ExecStart=/sbin/iwconfig wlan0 power off
RemainAfterExit=yes

[Install]
WantedBy=multi-user.target
As noted in the code block, I had a typo (netwrok instead of network) that went unnoticed for months. It is likely that this typo was the reason that I made two services, making the second one because the first one likely did not solve the issue. I have fixed the typo in this code block for clarity. If this corrected code block does not work for you, try the next one.
The second service I created was wifi-powersave-off.service:
[Unit]
Description=Disable Wi-Fi Power Save
After=network.target

[Service]
Type=oneshot
ExecStart=/usr/sbin/iw dev wlan0 set power_save off
RemainAfterExit=yes

[Install]
WantedBy=multi-user.target
With these two services in place, the intermitted connectivity issue was solved for a bit. However, this was not the only thing that caused connectivity issues for me.
Using a Wi-Fi Antenna to Avoid Interference
After replacing an old Vizio soundbar with a Sonos surround system and roaming speaker, I noticed that I was starting to have connection issues with the Pi again. It seemed that it would lose connection when all the Sonos speakers were active, but if I turned one off, the Pi would be reachable again. After a bit of research, I determined this issue to be the result of a crowded network. To solve this, I ordered a Wi-Fi antenna so that the Pi could join my 5G network. My 5G network appears to be much less crowded since most of the devices in my house (Sonos speakers included) only have the ability to join the 2.4GHz network. There are many Wi-Fi antennas out there. At the time of solving the issue, this one made the most sense. At the time of writing, there are many better deals out there.
Note: After adding in the Wi-Fi antenna,
wlan1became the primary network interface since on my RPiwlan0is associated with 2.4GHz andwlan1is associated with 5GHz.
Setting a Static IP in the Router Interface
A few months after getting the Discord bot and daily schedule working, I ran into an issue where the Raspberry Pi was assigned a new IP address on my home network. I looked into setting up a self-hosted DNS server to prevent this issue, but a much quicker and easier workaround was to simply register the IP as static in my home router's interface. In Arris, this can be done by selecting "Static Addresses" under the "Connected Devices" section of the left-hand navigation bar. From there, you can click on the button to manually add a static device and enter the appropriate information.
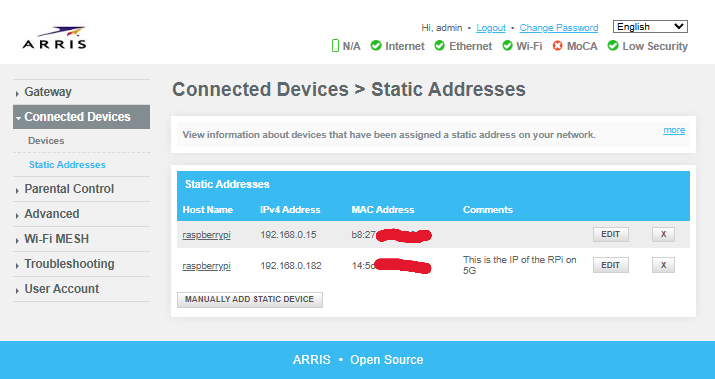
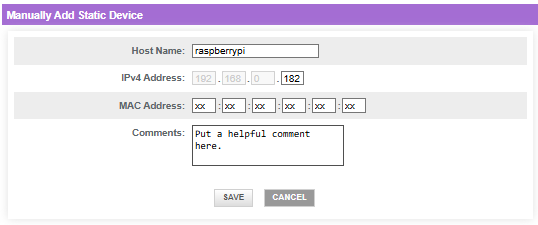
Adding a static IP in the Arris router interface.
Configuring a Static Fallback
After several months of using the static IP address reserved in the router interface without issue, the Pi suddenly started having connectivity issues again. It was different this time. The Discord bot would be unreachable, as would the Node-RED interface from another computer on my network. However, when I would connect my screen to the Pi it would show that it was still connected to my home network, but it no longer had an IP address. It turns out that the static IP reservation in the router doesn't prevent DHCP lease expiration. Rather, it just ensures the Pi always gets the same IP when it successfully requests one. In short, the Pi itself would be looking for a new IP from DHCP, but without a static fallback set up on it it would just lose the IP address. To fix this, I added the following to /etc/dhcpcd.conf:
# wlan1 Setup
# wlan1 configuration
interface wlan1
# Increase timeout for slow networks
timeout 60
# Disable rapid commit - can cause issues
nooption rapid_commit
# Persistent retry on failure
persistent

# Static fallback profile
profile static_wlan1
static ip_address=192.168.0.182/24
static routers=192.168.0.1
static domain_name_servers=192.168.0.1 8.8.8.8

# Apply fallback to wlan1
interface wlan1
fallback static_wlan1
As an additional insurrance, I made sure dhcpcd was up to date with the following commands:
dhcpcd --version
sudo apt update
sudo apt upgrade dhcpcd5
sudo apt upgrade dhcpcd
I then restarted the service with the following commands:
sudo systemctl restart dhcpcd
sudo systemctl status dhcpcd
In the output, there was a line that read
wlan1: leased 192.168.0.182 for 3600 seconds
This is a 1 hour lease time, which is apparently very short and explains why I would lose connectivity multiple times per day.
After making these changes, I set up some live monitoring with the command:
sudo journalctl -u dhcpcd -f
The idea here is that if the issue persists, it should fail in 2 hours and the live monitoring of the journalctl would display this. I also decided to leave the Pi alone for 30 minutes and then check for renewal attempts with the command:
sudo journalctl -u dhcpcd --since "17:39" | grep -i "renew\|rebind\|lease"
Life got in the way and I got sidetracked by many distractions and didn't get around to checking the results of these journalctl -u commands for 2 weeks instead of the intended 2 hours. However, the Pi and communications with the Discord bot appeared to maintain connectivity throughout this time. When I finally did pull up the Pi's GUI to check on it 2 weeks later there was only one DHCP lease expiration and reassignment from that initial night just before 10:00 pm. I decided to call the issue solved (at least for the moment).
Polishing and Final Touches
Utilizing Environment Variables
Because the Discord node requires the bot's token to be saved, it's good practice to save the token as an environment variable and reference this variable to configure the node. This ensures that the token is not accidentally included in the JavaScript code of the flow and won't be accidentally distributed to GitHub or any other repository where the flow code may end up. However, anyone with direct access to the Node-RED interface of your system can read the environment variable with a simple Debug print node. Keep this in mind if you plan to expose the port that your Node-RED service is running on.
To set up an environment variable, open up ~/.node-red/settings.js in your favorite text editor. At the top of the file, add the line:
process.env.DISCORD_TOKEN = '<token>'
You can replace DISCORD_TOKEN with any variable name you'd like.
To reference the environment variable in Node-RED, simply use the syntax ${VARIABLENAME}, or ${DISCORD_TOKEN} in this case.
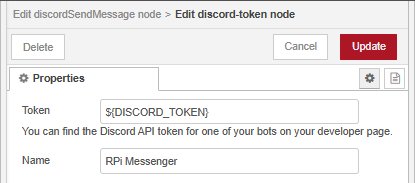
Referencing the Discord token from an environment variable in Node-RED.
For more details on using environment variables in Node-RED, see the official docs.
Building a Schedule
I quickly wanted the lights to do more than simply turn on or off at will after I got everything connected and running properly. I thought it would be great if I could also set up a schedule like my front porch light (which is controlled by a commercial IoT smart switch). The switch that controls my front porch light, however, has the limitation that I need to change the "on" time every few days during shoulder seasons when the sunset time is rapidly changing. After a few weeks of updating my "on" time for the front porch and now patio lights in Node-RED, I decided it would be a much better idea to set it based off of the sunset time for that day. I did this with the HTTP request node.
Every morning at 1:00 am, the flow uses an HTTP request node to find the forecasted sunset time for that evening. It originally was doing a simple web scrape of timeanddate.com. However, that website seemed to increase their restrictions after about a year of using this method and the flow started to consistently return error codes when trying to determine the sunset time. To solve this, I replaced the request with one to open-meteo.com, a free API that does not require a key. While troubleshooting this changeover I found it helpful to use the Discord bot to report the HTTP responses so I could have a better idea of what was going on.
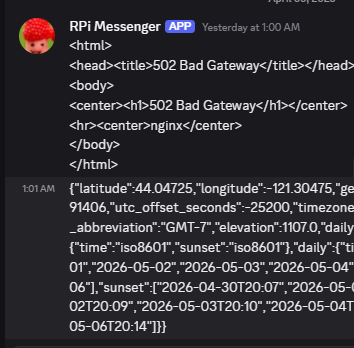
The Discord bot reporting a successful retry to the open-meteo API.
After the HTTP request node, there is a node to check for a 200 response code followed by nodes to convert the response to JSON and extract the sunset time. If the response code is anything other than 200, it then retries the request for 3 more times until ultimately setting a hard-coded time to schedule the evening "on" command. From there, the flow calculates and sets a delay based on the current time (1:00 am) and the sunset time. Once the delay has completed, the flow continues with sending the "on" command to the MQTT broker.
The Node-RED flow to dynamically set the lights "on" time to sunset of each day.
Adding Helpful Error Messages
To make the Discord bot a little more polished and professional, I though it would be nice to write some help messages that the bot could return if an incorrect command was sent. I thought it would look good for the bot to respond to an invalid command with a CLI inspired help message. Writing this help message turned out to be a bit tedious. I wrote the message as a JSONata expression and needed to add a \n any time I wanted a newline in the message. After some trial and error, it looked good enough to ship. I also decided it would be a nice touch to repeat the invalid command in the help message.
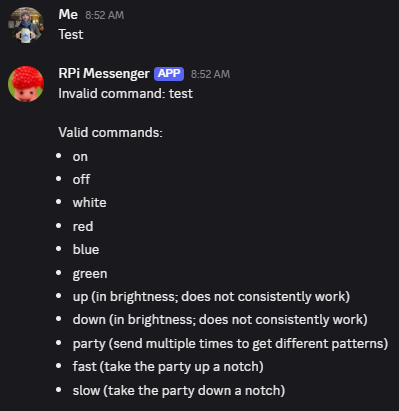
Adding in professional looking error messages is always a nice touch.
After setting up error messages that I felt satisfied with, I decided to take the messages to another level and use a similar technique to allow the bot to confirm a valid command before performing the action as well as reporting back on the result. A series of nodes to parse the device channel and the command gives a nice, personalized look to the responses.
String parsing adds a professional touch to the Discord bot messages.
Adding a Nightlight
Part of the reason I originally wanted to use my Raspberry Pi and create a smart hub rather than simply trying to use a Wi-Fi smart switch plugged directly into the patio lights was so that I could expand it to other devices. The next device I wanted to include in the system was a little IR controlled orb that I had left over from a Halloween costume and had been using as a nightlight. The "on" and "off" signals of this nightlight were some of the first that I captured on my Flipper Zero, so moving these files over to the Pi was no issue. However, I ran into some issues with transmitting the signal from the Pi. I also found it difficult to find a location for the Pi and its attached breadboard that could reach the RF receiver of the patio lights, be close enough to my home office for the wireless HDMI transmitters to communicate, and maintain a clear line of sight to the orb nightlight. I ended up solving this issue by replacing the IR controlled light with a small USB LED that I plugged into an RF controlled USB switch. As a bonus, this USB LED and switch take up much less space on my night stand and keep the clutter down.
It was a very simple and straightforward process of capturing the RF signals for the switch with the Flipper Zero and adding the hex codes from them to the list of options in the Python script on the Pi. I then added in a second channel in the Discord server for the #nightlight and added a new branch to the Node-RED flow. I now can control each light through its own respective channel on the Discord server.
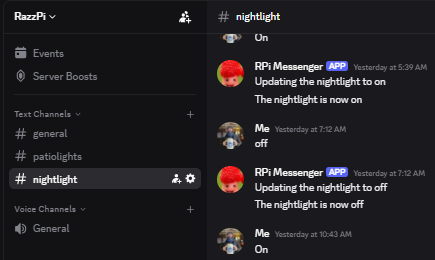
The updated channels list on the dedicated Discord server.
Adding Nightlight "On" to the Schedule
Like many people, I often have trouble waking up and getting out of bed in the morning. Turning on the lights definitely helps with this, especially when my first few alarms are set to times before sunrise. I decided to add a daily "on" command for the nightlight at the time of my first alarm to help initiate the waking up process and to try to prevent me from going back to sleep.
Adding Front Porch Light Control
My front porch light is controlled by a smart switch that uses the eWeLink app. I ended up with this switch because my house is old and strange and has had many "interesting" DIY renovation projects from previous owners (and admittedly from myself). This switch was the only one that I could find that would fit into the electrical box sunken in the drywall. The eWeLink app appears to be the only one that works with the switch. I did not know this when purchasing the switch and it took some research and troubleshooting to figure that out. The app allows me to build a schedule to turn the porch light on or off at consistent times throughout the day, as well as turn the light on/off remotely on demand. However, I find myself changing the scheduled evening "on" time by 15 minutes every week during the rapidly changing sunset times of certain parts of the year.
I had several ideas of how I might be able to integrate the switch with the Raspberry Pi, including to search for and utilize a Node-RED library, to somehow integrate the switch with Home Assistant, or to set up a proxy or MitM and capture the data entering and exiting the smart switch. I was able to find some Node-RED libraries out there for eWeLink devices. However, they all appear to be out of date and the protocol that eWeLink uses appears to have changed since their last updates. I really liked (and still do) the idea of setting up a proxy/MitM attack on my own device to figure out how it works, but that's much more involved and I haven't had the time to devote to it yet. Luckily, one day when I was poking around the eWeLink website I stumbled upon the eWeLink API.
Note: The general path that led me to find this API was the following:
- Visit the eWeLink main website
- Click on Home Assistant in the "works with" section
- Click on the GitHub link in the "Installation" section
- Click on the CoolKit-Technologies organization link in the upper-left
- Click on the link to the eWeLink-API under "Popular repositories"
- Start exploring the repository
Experimenting with the API
It took a lot of searching/wandering/hunting/clicking around to find that API, but once I did I realized I had likely stumbled upon the one I was looking for. I pulled up Insomnia and started experimenting with the API. After a bit more internet research, I found a blog post that hinted at how the authorization of the API worked. Despite the post's poor grammar, it gave me enough information to lead me to an eWeLink web interface. I used the eWeLink app on my phone to log into the interface and, sure enough, I saw my front porch switch in my listed devices.
Once authenticated and logged in, it is then possible to pull up the developer tools or Inspector of your web browser, click on the Network tab, and refresh the page to view all the files and resources. Several of these files, including profile, my-scene, and query, will display a bearer token in the Request Headers. I copied this token value and then added an Authorization header to the API calls in Insomnia with the value of Bearer <token value>. The API call worked and I was able to see the information about my device in the response!
Now that I could make authorized API calls from Insomnia, I experimented with different endpoints and parameters until I found a way to turn my light on/off. This call is listed in the documentation here. It is a POST request to the endpoint:
/v2/device/thing/status
Note: The base URL for the API depends on your region.
Be sure to include the Authorization header as described earlier, and in the body use the following JSON content:
{
    "type": 1,
    "id": "<Your device id>",
    "params": {
        "switch": "off"
    }
}
If you are unsure of your device id, you can find it by retrieving the "Thing List". Do this by sending a GET request to /v2/device/thing.
Since my device is a simple light switch, this is all the information I needed to include in the API request body. I updated "off" to "on" and was able to confirm the API call was successful because the status of the light was updated in the response body, on the web interface, and on my mobile app. Most importantly, I was able to visually confirm that the light would turn on/off in response to the API calls!
Integrating the API with the Discord Bot
Now that I had the API working correctly, it was time to incorporate it with the Discord bot. I added another channel on the Discord server for the front porch light and began to add it to the Nod-RED flow.
I took this opportunity to significantly refactor the Node-RED flow to make it cleaner and DRY it out. Rather than listing the devices, their descriptions, and their valid commands in nodes that set this information as flow variables, I moved all the information to a file named devices.json. This was much more readable and maintainable than hunting for information in various nodes. I also added a field for device type in this JSON file so I could divert the flow through the nodes based on if the device required an RF signal via the exec node or an API call via an http request node.
Continuing to refactor and clean, I got rid of the weird merging business around the exec node and simply passed the data through the node. This made it much easier to follow and much less messy looking. Utilizing the link in and link out nodes also helped better organize things and keep the "wires" from crisscrossing all over the place.
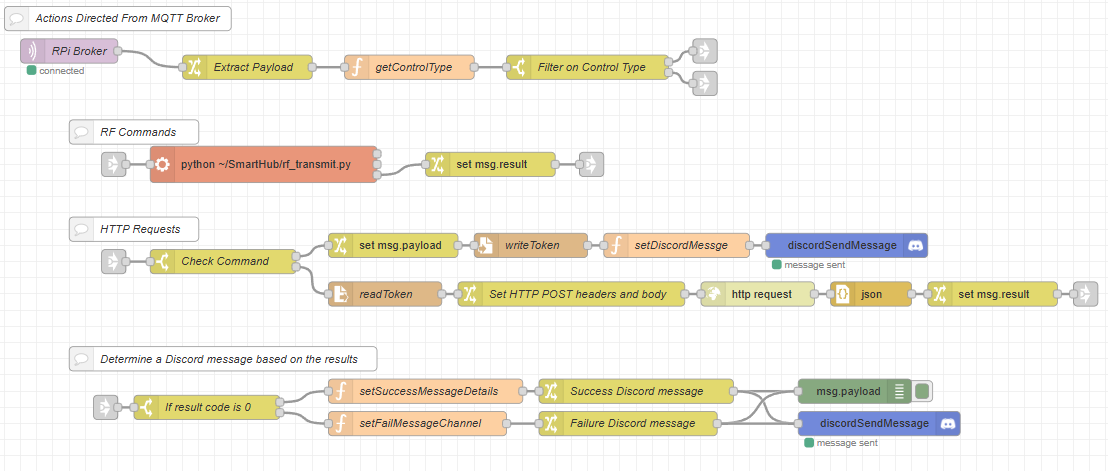
The refactored command execution section of the flow.
Adding the Front Porch Light to the Schedule
After cleaning up the flow and adding on-demand control of the front porch light, incorporating the front porch light to the schedule was simple. Because the API still goes through eWeLink and the rest of my schedule on the eWeLink app works for what I need, I only updated the evening "on" time to match the patio lights' dynamic sunset time. At this point I realized it would be better to adjust the delay to turn the lights on 10-15 minutes before sunset instead of at the exact moment of sunset, so I updated that too.
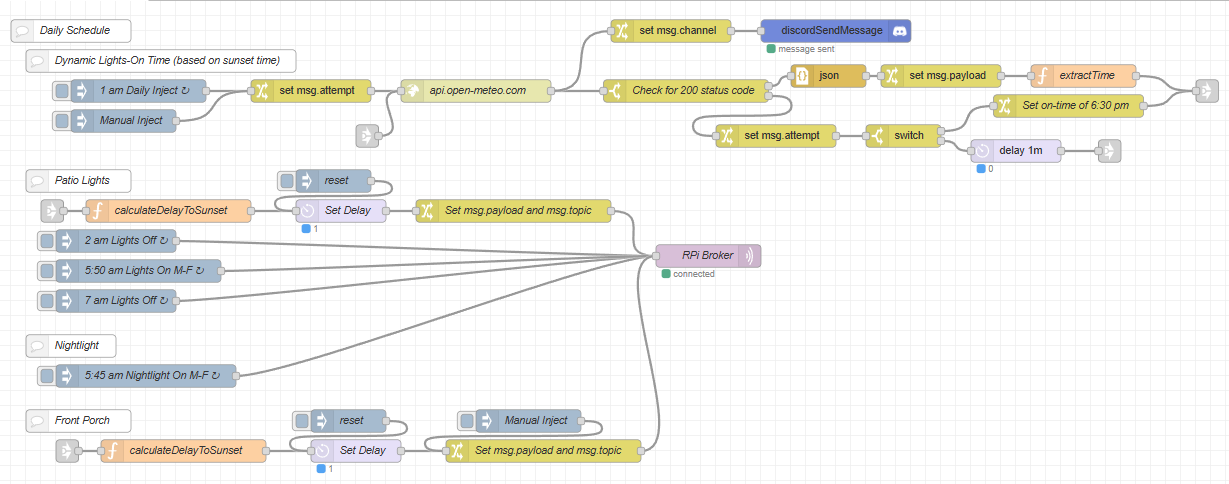
The daily schedule after adding the front porch light and some refactoring.
Securing the Bearer Token
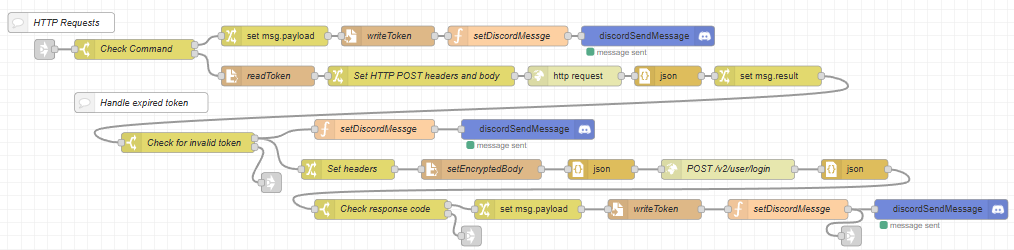
The last aspect of integrating the front porch light with the Discord bot was to add a command to update the bearer token. Because the bearer token will expire after a certain amount of time or be replaced after subsequent logins to the eWeLink web interface, I wanted a way to remotely update it. I started by saving the token value to a file called token.txt and put it in the project directory on the Pi next to the python RF script. The Node-RED flow reads the contents of the file and adds it to the headers for the http request node. When doing this, I figured it would also be a good idea to save the device id of the switch as an environment variable and call it much like the Discord token, so I went ahead and did that too. Because the Discord bot communicates over a secure WebSocket (as described above) and the Discord server is private, it should be OK to send the bearer token over this channel. When the Discord bot receives a new token, it then overwrites the file on the Pi with the new value. Subsequent HTTP requests will then be made using this new token value.

The HTTP request section of the flow reads/writes the bearer token from/to a file so it's not included in the source code.
Adding Automated Bearer Token Updates
With the setup described so far, when the Pi goes to turn on the front porch light at sunset and encounters an error from an expired bearer token, the error message is forwarded via the Discord bot and requires action on my part to update the token. I decided to automate this process after a couple times of experiencing this in inconvenient locations (it's easy to do from a computer, not so easy to do from a phone). To automate the token renewal I needed to analyze the web requests in a bit more detail. I hopped onto my Kali Linux VM and opened up Burp Suite to capture the web traffic as I logged into the eWeLink web interface.
Note: Kali Linux and Burp Suite are not necessary to figure out the details of the login request. This could have been done by using the browser developer tools, Insomnia, and the eWeLink API documentation, just like the process used to determine the API requests above. However, Burp Suite does make this process quite a bit smoother.
Logging in by scanning the QR code with the eWeLink mobile app didn't provide any useful information, but logging in with my email and password did. The login request had an encrypted payload which I suspected was my username and password. After a couple minutes of trying to decrypt the payload I decided to just send the request to the repeater to see if it was anything more than my basic login information. I was relieved to find that the same request worked repeatedly. Just sending the encrypted payload with the correct headers was good enough to log in. Not only that, but the bearer token was sitting in plain text right in the response body. I then started removing the request headers one at a time to determine the minimum necessary to get a successful response.
After I had trimmed down the required headers, I reproduced the login request first in Insomnia, then in a Node-RED scratch flow. Once I was able to confirm that I could get the bearer token from a web request in Node-RED, I integrated it into the flow so that if it gets a 401 response it sends a login request, updates the token, and then tries the last command (on or off) again.
There is a potential that this encrypted data for the login request could be cracked even though I wasn't able to decrypt it myself (I didn't try very hard). To be on the safe side, I decdided to read it from a file rather than hard-code it into the flow and commit it to GitHub. I saved the encrypted data in a text file in the project directory next to the token.txt file and set a node to read it and add it to msg.payload before sending off the API request.
The Node-RED flow now handles an expired eWeLink bearer token.
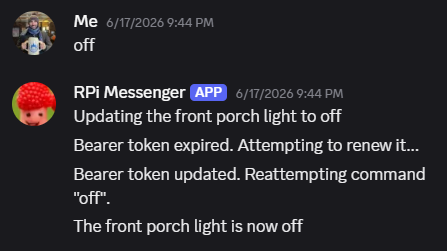
The Discord bot reporting an expired and renewed bearer token for the eWeLink API.
Cat-Proofing the Hardware
The RPi and breadboard with the RF transmitter on it sit on a dresser just beneath a large window in my bedroom. This is because it is the only place I could find where the underpowered RF transmitter can still reach the patio lights and night light receivers, yet the wireless transmitter and receiver for the monitor and keyboard in my home office would still be able to communicate. I never felt comfortable leaving it here since it is a window that my cats commonly like to hang out in. The dresser also tends to collect clothing and other random things that don't immediately get put away where they belong when they are done being used. Furthermore, the dresser does not sit flush against the wall because of the baseboard. While this is nice for running wires behind the scenes, it also leaves open a risk that my curious and careless cats (and I) might knock the breadboard and RF transmitter into the crevasse behind.
While attempting to troubleshoot the transmission distance with various antennas one day, I decided to make a quick housing for everything out of a couple boxes left over from some online shopping. It's not the most elegant looking solution, and as everyone knows, cats love boxes, so it's still not 100% cat-proof. However, the box provides much more assurance from accidentally knocking wires loose or dropping pieces of hardware behind the dresser.

The inside of the "housing" for the hardware.
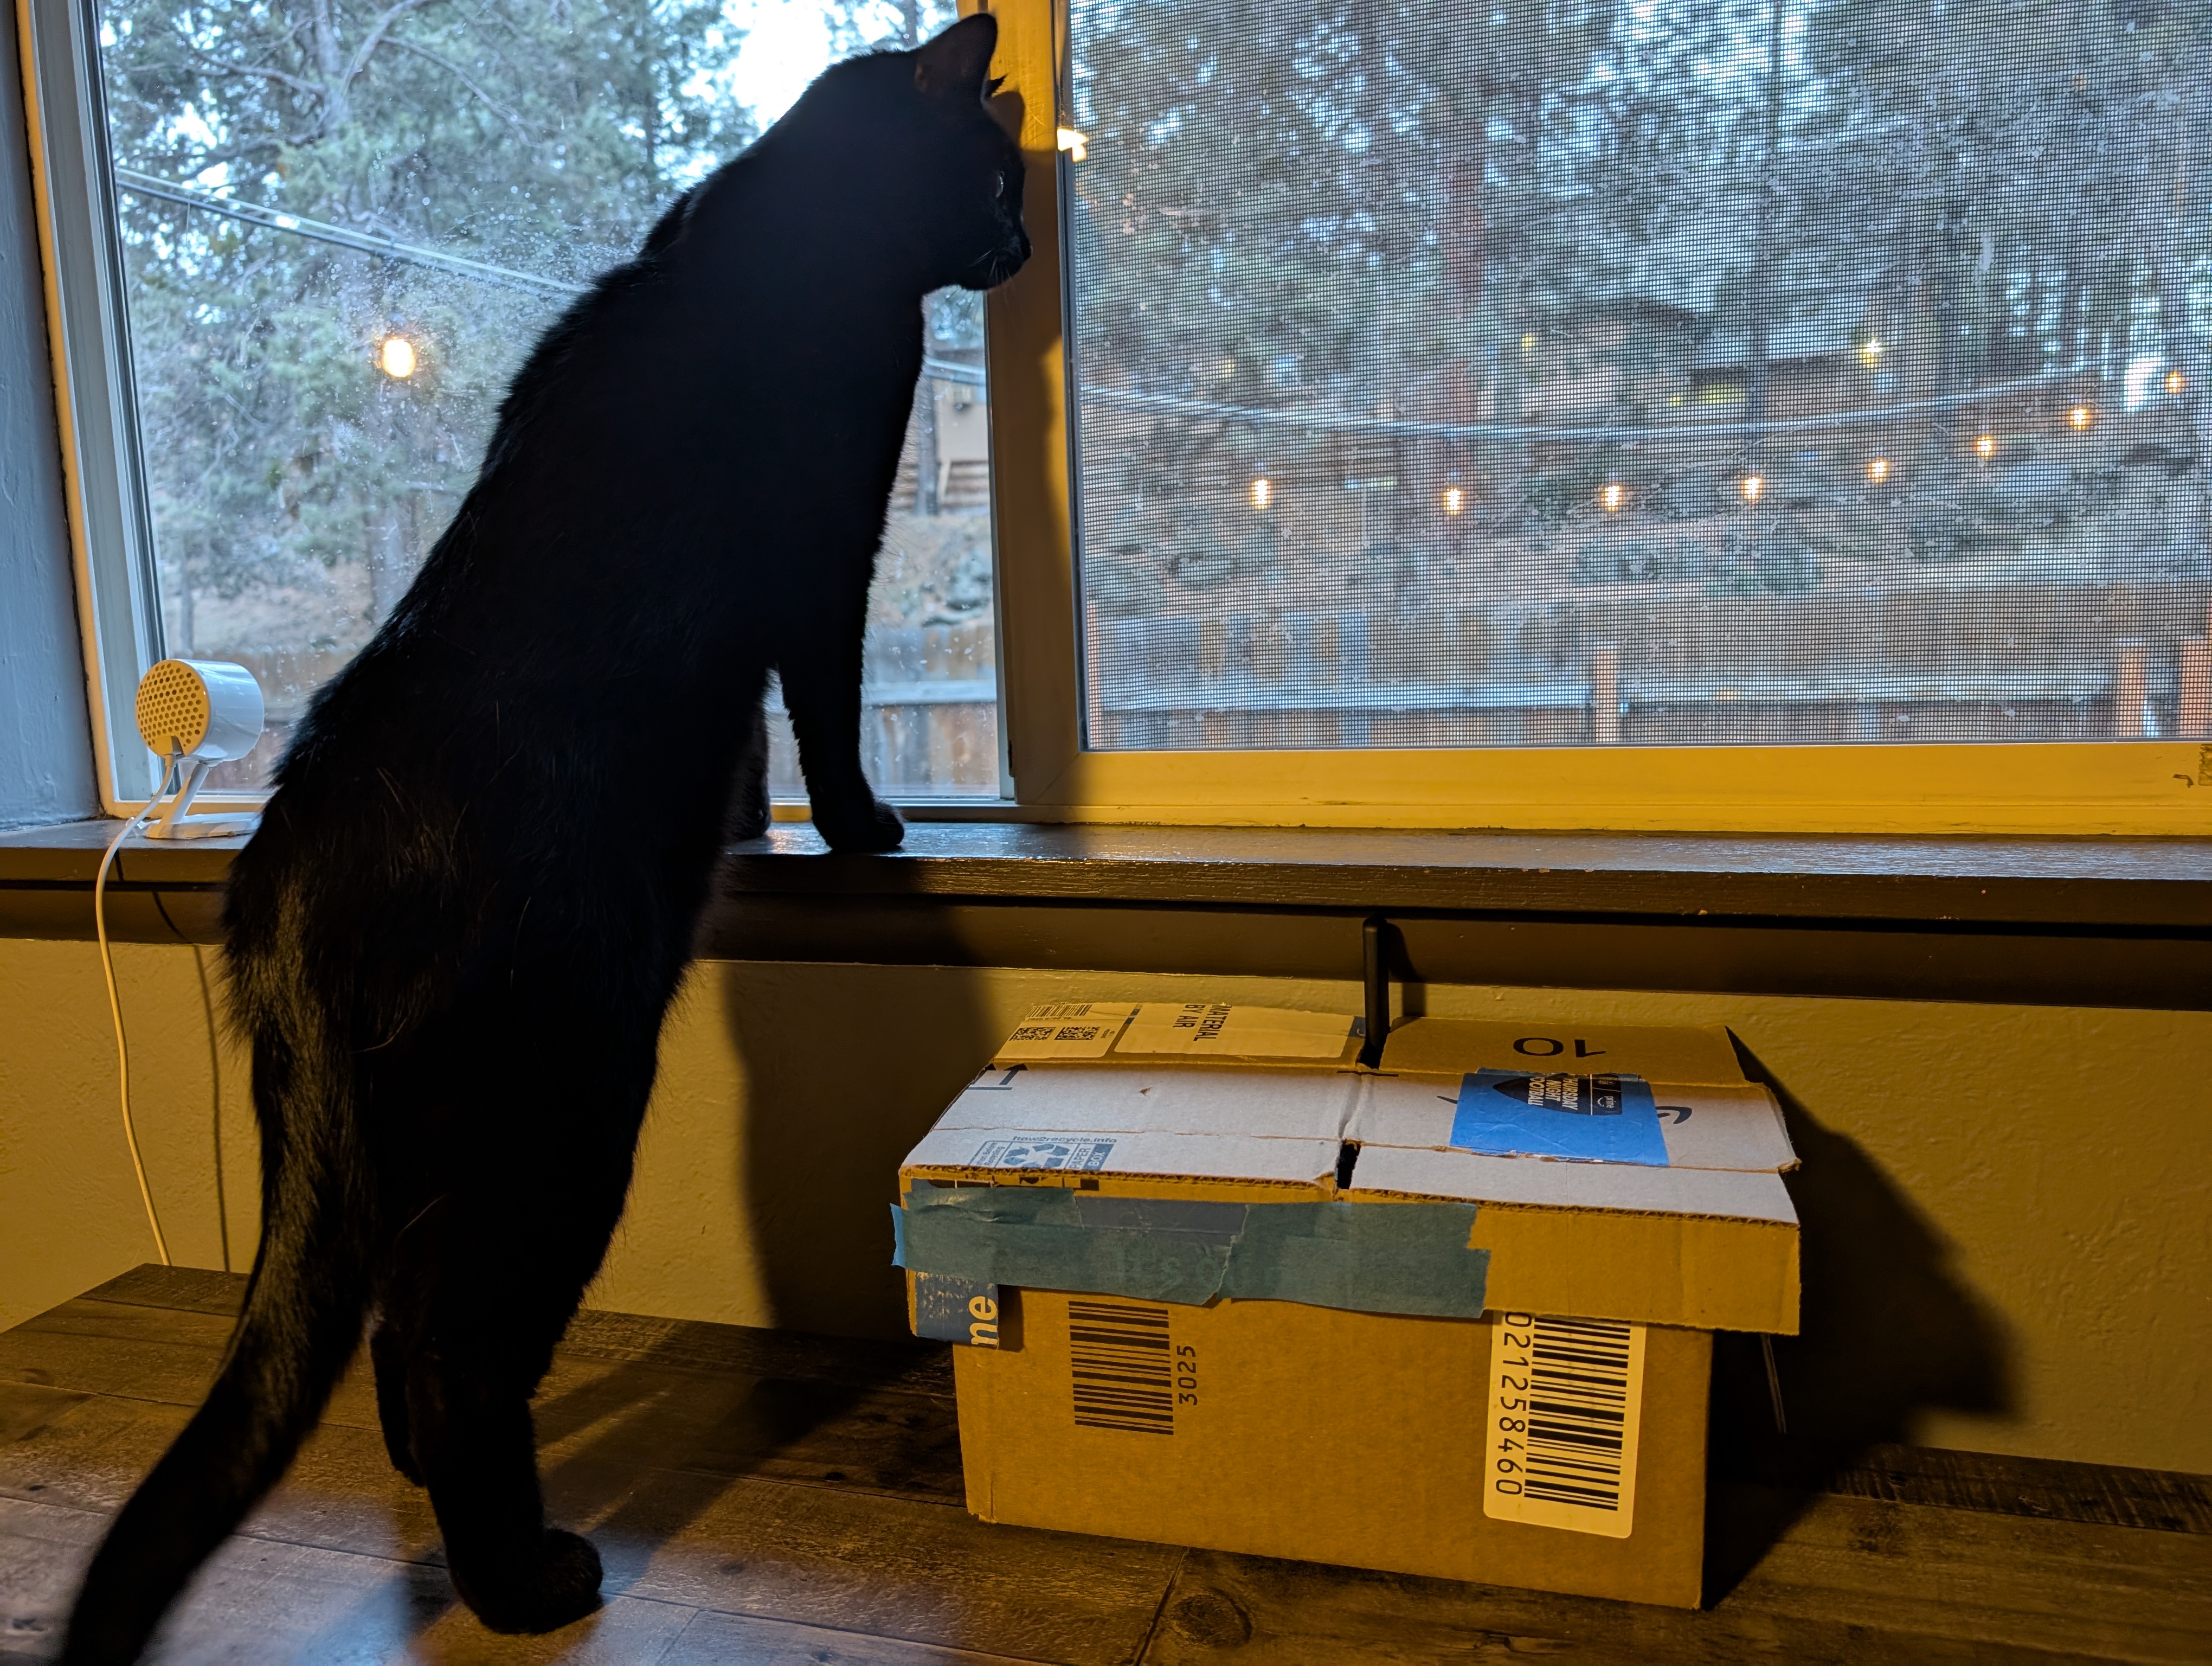
One of my cats demonstrating the proximity of the hardware to the window.
Results
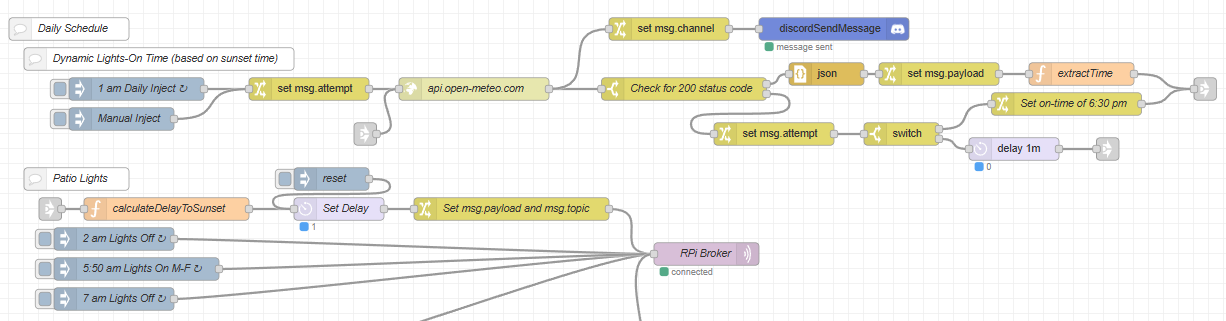
The most up-to-date Python code and Node-RED flow can be found in this GitHub repository.
Here is an image of the current Node-RED flow. Part of what makes Node-RED so great is that you can visually follow the logic and understand how the program works.
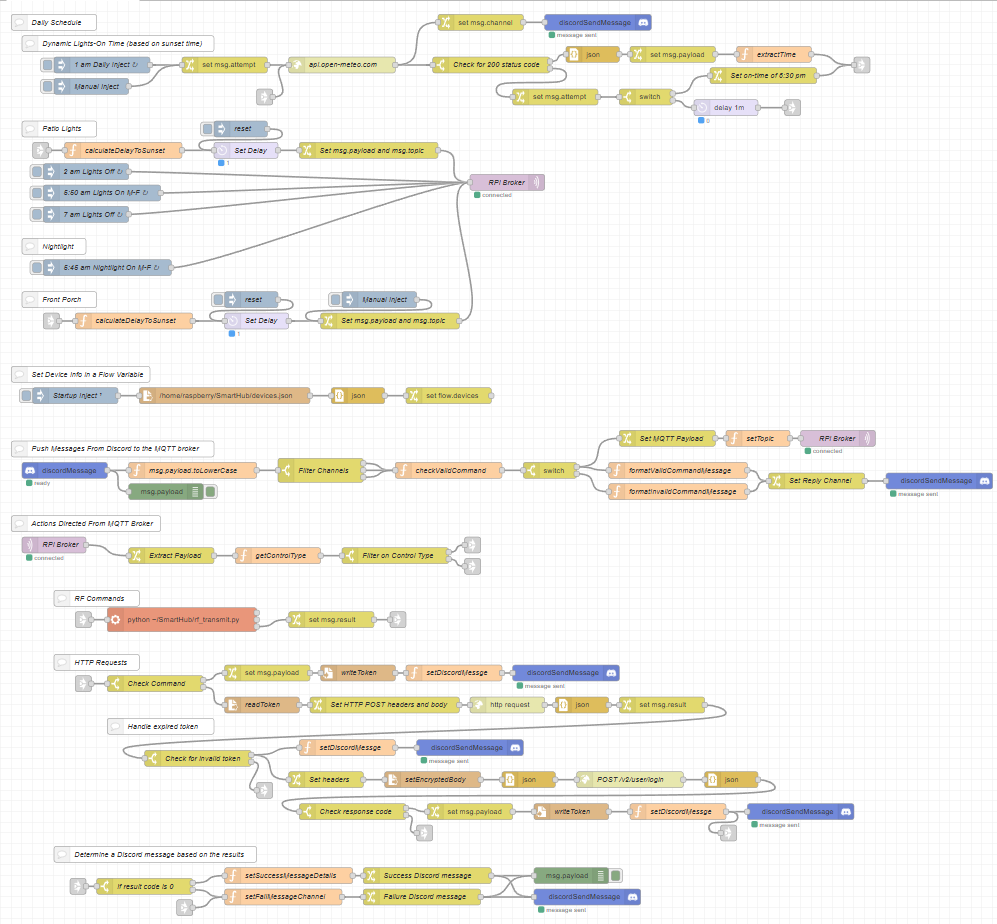
The final Node-RED flow as of this writing.
Future Expansion
I have several ideas of where I would like to take this project as time allows. They are listed as follows.
Add Self-Hosted DNS
As mentioned earlier, I considered self-hosting a DNS server to prevent the RPi from being assigned a new IP at inconvenient times. Assigning a static IP through the router interface provided a much easier solution. However, making a self-hosted DNS server is a great project and learning experience and is therefore still on my list of future expansions. I could possibly do this with an old laptop that still works but I no longer use, or even with the Pi itself.
Strengthen the RF Signal
Either from my lack of soldering skills or from my misunderstanding of how the RF transmitter chips work, every time I tried to attach an antenna to the chip I seemed to fry it and it would not send out the RF signal. Improving the strength of the signal would greatly increase the possible locations where I can store the device. After a week of experiencing issues sending the signal to the nightlight, I ordered this pack of transmitters and receivers. I have not yet attempted to attach an antenna to the replacement hardware, but it already seems to have somewhat improved the signal.
Get a Proper Housing for the Components
The box mentioned above in the Polishing and Final Touches section provides a good, temporary solution for preventing my cats (or myself) from messing with the hardware, pulling wires, and/or dropping it behind the dresser where it sits. However, I would like to make a more elegant solution. Something like a custom made wooden or 3D printed box would look a lot nicer as well as provide more strength to hold up against prying paws. Strengthening the RF signal would also increase the number of locations where I could store the setup and would therefore influence the design of the housing.
Add Ceiling Fan Control
My ceiling fan is also controlled with an RF remote. Unfortunately, the frequency this remote works on (300.00 MHz) is not in a range that is legal for civilian use (at least in my area). Even though I've captured the signals from the fan, I cannot emulate the signals on the Flipper Zero because I have the stock firmware on it. A handy table can be found in the Flipper Docs that displays bands of frequencies that are legal to transmit in various regions. Additionally, a chart of frequency allocations in the U.S. can be found here. I would like to find an RF transmitter that can send this frequency and include it in the project. This would not only allow me to control the light and fan speed from other rooms, but I would also then be able to enhance my "lights on" morning alarm.
Hardware Hack the Front Porch Light Switch
As mentioned above, the Node-RED flow utilizes the eWeLink API to control the front porch light. This API still runs through eWeLink. While I'm not too concerned with any data eWeLink might be collecting about my front porch light habits and have not yet deemed it a security risk, I still like the idea of completely taking the switch offline and fully controlling it with my own, local devices. If for nothing else, I think this would be a fun and interesting project that will likely involve either hardware hacking the switch, setting up a device to act as a proxy or MitM and capture the data entering and exiting the smart switch, or simply replacing it with an alternative microcontroller. I like the idea of replacing it with a microcontroller to essentially build a DIY smart switch from scratch because I think that could be a great learning experience. However, the environmentalist in me prefers to make the most of what I already have and not generate more waste by replacing something that already works with something new. I also have always been fascinated by taking something and reworking it in a way so that it can do something which it was not originally intended to do.
Build an Android App
As mentioned at the beginning of this writeup, having a custom Android app to send the MQTT signals is completely feasible and is probably good practice for my mobile development skills. However, the Discord bot works well enough that this expansion goal is at the end of the list.
Home Personal Projects OSU Projects Element 1 Projects Videos
(C) Seth Weiss, 2025